

How do I install Claude skills?
A Claude skill is a folder containing a SKILL.md file, and installing one means putting that folder where your agent looks for skills. On Claude Code that's ~/.claude/skills/. On Claude Desktop it's a folder or zip uploaded through Settings. On the other agents that read the same open format, it's a similar per-agent directory. There's no installer to run, no license to accept, and nothing platform-specific about the folder itself, only the location changes.
Two routes get you there. The skills CLI writes the folder to the correct place for you in one command:
npx skills add owner/repo/skill-name --agent claude-code
Or you copy the folder yourself (with git clone, a downloaded zip, or a plain cp) into whichever directory your agent scans. Both routes are covered in full below, along with the exact path for every agent this site tracks, what to do if you're specifically after a download rather than an install, and how to pull a skill straight from a GitHub repo.
None of this changes based on your operating system or which language your OS or Claude's interface is set to. Whether you're on macOS, Windows, or Linux, and whether Settings shows English or German labels, the underlying paths, commands, and folder structure are exactly the same. See "Does installing differ on macOS, Windows, or Linux?" further down for the specifics.
Where does each agent look for installed skills?
This table is the fast answer if you already know which agent you're using. Personal paths apply across every project; project paths scope a skill to one repository. Where a platform has its own step-by-step guide on this site, it's linked in the last column.
| Agent | Personal / global path | Project path | Full guide |
|---|---|---|---|
| Claude Code | ~/.claude/skills/ | .claude/skills/ | Install in Claude Code |
| Claude Desktop | Settings → Capabilities → Skills | n/a | Install in Claude Desktop |
| Claude Cowork | Cowork → + menu → Skills | Team skill directory (Team/Enterprise) | Install in Claude Cowork |
| Claude API | Container upload | n/a | Use skills with the Claude API |
| Codex CLI | ~/.codex/skills/ | .codex/skills/ | Install in Codex CLI |
| Cursor | ~/.cursor/skills/ | .cursor/skills/ | Install in Cursor |
| Google Antigravity | ~/.agents/skills/ | .agents/skills/ | Install in Google Antigravity |
| GitHub Copilot | ~/.agents/skills/ | .github/skills/ | Install in GitHub Copilot |
| Windsurf | ~/.agents/skills/ | .windsurf/skills/ | Install in Windsurf |
| OpenCode | ~/.agents/skills/ | .opencode/skills/ | Install in OpenCode |
| Cline | ~/.agents/skills/ | .cline/skills/ | Install in Cline |
| Roo Code | ~/.agents/skills/ | .roo/skills/ | Platform page |
| Goose | ~/.agents/skills/ | .goose/skills/ | Platform page |
| Kiro | ~/.agents/skills/ | .kiro/skills/ | Platform page |
| Continue | ~/.agents/skills/ | .continue/skills/ | Platform page |
| Trae | ~/.agents/skills/ | .trae/skills/ | Platform page |
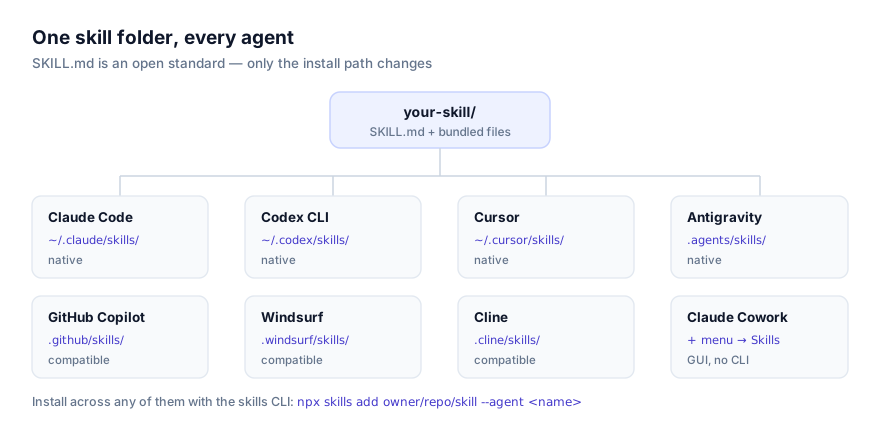
That's 16 agents in total, as of August 2026. Most of the newer entrants converge on ~/.agents/skills/ as the personal path, each with its own project-scoped folder underneath. A recent, useful bit of convergence if you run more than one of these tools. Claude Desktop, Claude Cowork, and the Claude API don't expose a filesystem path the way a terminal agent does: Desktop and Cowork are upload flows through a menu, and the API takes a container upload for production use. Claude Managed Agents on the API can also load skills automatically straight from a GitHub repository's root .claude/skills directory (no manual step at all) which is covered in the Claude API guide.
How do I download a Claude skill?
There's no .exe, .dmg, or app-store listing to download, and that's deliberate rather than a gap. A skill is source code, not a compiled program, and the whole point is that you can read it before it runs on your machine. "Downloading" a skill means getting its folder from GitHub onto your disk, and there are three honest ways to do that:
Run the CLI. This downloads the folder and places it in your agent's skills directory in one step, the closest thing to a one-click install this ecosystem has:
npx skills add owner/repo/skill-name --agent claude-code
Clone it with git. This gets you the plain folder, under version control, wherever you point it:
git clone https://github.com/owner/repo skill-name
Use GitHub's own "Download ZIP" button. Open the repository on GitHub, click Code → Download ZIP, and extract it locally. This is the route if you don't have git or Node available, or if you just want to look at the files before deciding where they go.
Every skill listed on this site links to its real GitHub source rather than a packaged download hosted here, so whichever of the three methods you use, you're downloading from the same place you'd review the code. Once you have the folder on disk, "installing" it is the separate, final step of moving or copying it into your agent's skills directory from the table above, or, for Claude Desktop, uploading the folder or zip directly through Settings without needing it anywhere else on disk first.
How do I install skills in Claude Code?
Claude Code is the reference implementation of Agent Skills, and its install path is the one most other agents' directories are modeled on: ~/.claude/skills/ for every project, .claude/skills/ for just the current one.
# CLI. Writes the folder for you
npx skills add owner/repo/skill-name --agent claude-code

# Manual, personal scope, every project
git clone https://github.com/owner/repo ~/.claude/skills/skill-name

# Manual, project scope, this repo only
git clone https://github.com/owner/repo .claude/skills/skill-name
Start a new session afterward. Claude Code reads every installed skill's name and description once, at session start, not continuously. A skill dropped in mid-session stays invisible until you restart. Project scope is the safer default when you're not fully sure a skill should be trusted yet, since it's git-tracked and reviewable in the same pull requests as the code it touches. Full walkthrough, including verification steps and Claude Code–specific failure modes, is at how to install skills in Claude Code.
How do I install skills in Claude Desktop?
Claude Desktop (on macOS, Windows, or in the browser) is the one platform on this list with no filesystem path and no terminal step at all. The install route is entirely inside the app:
- Open Settings → Capabilities → Skills.
- Upload the skill as a folder (where your browser or OS supports folder upload) or as a
.zipfile. - Confirm it appears in the list, enabled.
- Start a new conversation, like every agent here, Desktop reads skill metadata at the point a conversation begins, not retroactively into one already open.
That's the whole process, and it's identical whether you're installing on Mac or on Windows. Desktop's install method doesn't branch by operating system the way a CLI agent's shell does, because there's no shell involved. There's also no separate project-scoped install: Desktop's project path is not applicable, so whatever you enable in Settings is available across every conversation on your account. Full walkthrough, including why script-heavy skills are a poor fit for Desktop specifically, is at how to install skills in Claude Desktop.
How do I install a skill from GitHub?
Every skill on this site (and almost every skill anywhere) lives in a GitHub repository, so "installing from GitHub" is really just the download step above followed by placing the folder correctly. Two ways to do it directly, without a separate zip-and-extract step:
# Clone straight into your agent's skills directory
git clone https://github.com/owner/repo ~/.claude/skills/skill-name

# Or let the CLI resolve owner/repo/skill-name for you
npx skills add owner/repo/skill-name --agent claude-code
The owner/repo/skill-name format matters when a single repository bundles more than one skill rather than shipping just one at its root. The CLI needs the path to the specific skill folder inside the repo, not just the repository itself. If you're not sure of that path, open the repo on GitHub first and look for a folder containing its own SKILL.md.
One route needs no manual copying at all: Claude Managed Agents on the Claude API can read skills straight from a GitHub repository, discovering anything placed in the repo's root .claude/skills directory automatically at session start. That's the closest thing to a zero-step GitHub install currently available, and it's specific to the API. See the Claude API guide for the details.
Whichever method you use, resist the urge to trust a repo just because it's linked from a directory site, including this one. Open SKILL.md and anything in scripts/ before you clone, more on that in the security section below.
Is there a single Claude skills bundle I can install?
Not as one downloadable file. Every skill is its own folder with its own SKILL.md, and there's no packaging format that zips several of them into one installer, installing three skills means three folders landing in your skills directory, however you get them there.
Two things do function like a bundle in practice, though:
Curated collections, browsed one at a time. This site organizes skills into categories (development, writing, design, data, security, and others) so instead of searching GitHub cold, you can browse a set that's already grouped by the kind of work it does and install whichever ones fit. Start at getclaudeskills.com/categories for the full list, or jump straight to getclaudeskills.com/skills to browse everything.
A repo with several skills checked in, cloned once. If a team maintains multiple skills for its own workflows, the practical way to distribute all of them at once is committing every skill folder into one repository's .claude/skills/ (or the equivalent for another agent) and having teammates clone that repo. From that point on, a git pull updates every skill in it together, the closest thing to bundle-level installing and updating that the current tooling supports.
Does installing differ on macOS, Windows, or Linux?
The paths in the table above are written with ~, which means "your home directory" and resolves the same way conceptually everywhere: /Users/you on macOS, /home/you on Linux, and your user profile folder on Windows. Terminal-based agents (Claude Code, Codex CLI, Cursor, and the rest) run inside a shell that expands ~ to that location automatically, whether that shell is Terminal on macOS, a native shell on Linux, or PowerShell, Git Bash, or WSL on Windows. If you're ever unsure whether your specific shell expands ~ the way you expect, the skills CLI sidesteps the question entirely. It resolves the correct absolute path itself rather than relying on shell expansion, so npx skills add owner/repo/skill-name --agent claude-code writes to the right place regardless of platform.
Claude Desktop and Claude Cowork don't have this question at all, since Settings → Capabilities → Skills and the Cowork + menu are graphical flows that look and behave the same on every operating system they run on.
None of this is affected by language either. If your OS or Claude's interface is set to German (a common search here is "claude skills installieren") the paths, commands, and folder structure are identical to the English instructions on this page; only the labels inside Settings are translated. There's nothing to adapt beyond following the same steps above.
Why isn't my skill showing up after I install it?
It installed, but the agent never reaches for it. By far the most common cause, on every platform: the description field doesn't name a concrete trigger, and the description is the entire discovery surface an agent has for deciding when to use a skill.
# Too vague to ever match a real request
description: "Helps with reports"

# Names the actual trigger conditions
description: "Compiles the weekly sales pipeline report from CRM exports into the standard format finance expects. Use when asked to build, update, or format the weekly pipeline report."
It worked before, now it seems to have vanished. You edited SKILL.md or added a new skill without starting a new session. Every agent covered here reads skill metadata once at startup. Restart before concluding anything is actually broken.
The folder's there, but SKILL.md isn't found. Almost always an extraction artifact from a zip download: it unpacked into skill-name/skill-name/SKILL.md instead of skill-name/SKILL.md. Flatten the extra layer so SKILL.md sits directly inside the folder your agent scans.
A bundled script fails as soon as the skill runs. Skills that ship scripts need an agent with tool execution available, plus whatever the script itself depends on, python3, node, jq, a cloud CLI. Read the script (you should be reading it before installing anyway) to see what it assumes, then check with which <tool>.
Two installed skills fight over the same request. If two skills declare the same name, or the same skill sits duplicated at both personal and project scope with diverging edits, which one actually fires isn't something to bet on. Rename one, or delete the duplicate.
Should I read a skill before installing it?
Yes. A skill can ship executable scripts, and any agent with tool execution will run them when the instructions call for it. Before installing anything, open SKILL.md and every file under scripts/. Check what commands it runs, what it reads or writes on disk, and whether it talks to the network. This is exactly why this site links out to a skill's source on GitHub rather than hosting a packaged download: you can read the code in the same place you're about to pull it from, before it ever touches your machine. When you're not fully confident a skill is trustworthy, install it at project scope rather than personal scope. That limits its reach to one repository and gives a teammate a small, git-tracked diff to review instead of something sitting invisibly in your home directory. The full security guide covers what a proper review should check for beyond this quick pass.
Where to go next
If your agent has a dedicated guide linked in the table above, go there next, each one covers verification steps, agent-specific quirks, and failure modes this page deliberately leaves out to stay agent-agnostic. If you're new to the concept entirely, back up to what are agent skills and the SKILL.md format explained. If you'd rather build a skill than install someone else's, how to write your own agent skill covers the format in full, and how agents discover and activate skills explains the mechanic behind why a good description matters as much as it does.
Otherwise, start browsing: all skills, by platform, or by category.