

Start from a real, recurring task
The best skills come from something you already do repeatedly and could describe as a procedure, reviewing pull requests a specific way, drafting a specific kind of report, enforcing a house style. If you can write down the steps you follow by hand, you can write a skill.
This guide builds one from scratch, step by step: a skill that drafts a changelog entry from a git diff, following a consistent format. By the end you'll have a working SKILL.md, know why the description field matters more than anything else in the file, and know how to test that the skill actually fires when it should. Hand-writing SKILL.md is the precise, portable path to a skill; if the task in front of you is more GUI-driven than code-driven, Record a Skill in Claude Cowork is a second, demonstration-based path worth knowing about too. See Recorded Skills vs Hand-Written SKILL.md for which suits which task.
Step 1: create the folder
Skill folders are named after the skill, lowercase and hyphenated:
mkdir changelog-entry-writer
cd changelog-entry-writer
That name will also be the name field in frontmatter, by convention.
Step 2: write minimal frontmatter
Start with just the two required fields:
---
name: changelog-entry-writer
description: Use when the user asks to write a changelog entry, release note, or "what changed" summary from a git diff or list of commits.
---
Stop and look at that description again, because it's doing almost all the work in this file.
Step 3: get the description right. This is the highest-leverage part
Here's the thing that matters more than anything else in this guide: the description field is the entire discovery surface. An agent doesn't read the body of every installed skill on every request. It reads only name and description at session start, and matches your request against those. If the description doesn't name a concrete triggering situation, the skill sits there installed and unused, however good the body behind it is.
Compare these two:
Weak: description: A changelog skill.
Strong: description: Use when the user asks to write a changelog entry, release note, or "what changed" summary from a git diff or list of commits.
The weak version describes the skill's category. The strong version describes the situation a real user would be in when they need it, including phrasing close to what someone would actually type. That's the difference between "technically accurate" and "actually triggers."
A few patterns that make descriptions stronger:
- Name the trigger, not the topic. "Use when the user asks to review a pull request for security issues" beats "A security review skill."
- Include phrasing variants. Users don't all ask the same way. "write a changelog entry," "summarize what changed," "draft release notes" are the same request in three phrasings. Covering a couple of them in the description widens the match without making it vague.
- Say what it's not for, if there's an obvious near-miss. If you have a separate skill for full release announcements versus terse changelog bullets, a short disambiguating clause avoids the wrong one firing.
- Keep it to one or two sentences. This field is read for every installed skill at every session start. It needs to stay cheap, not turn into a second body.
Step 4: write the body as a procedure
The body is markdown, read in full once the skill activates. Write it the way you'd write a runbook for a competent colleague who's never done this specific task before, specific and sequential, not a general description of the goal.
## When to use this

Trigger when the user provides a git diff, commit list, or PR link and
asks for a changelog entry, release note, or summary of changes.

## Workflow

1. Read the full diff or commit list before drafting anything. Group
   related changes together rather than listing commits one by one.
2. Classify each change as Added, Changed, Fixed, or Removed.
3. Write one bullet per user-facing change, in plain language a user
   of the product would understand, not implementation detail.
   Skip changes with no user-facing effect (refactors, internal
   renames, test-only changes) unless the user explicitly asks for
   an internal changelog.
4. Order bullets: Added, then Changed, then Fixed, then Removed.
5. Keep each bullet to one line where possible.

## Constraints

- Don't invent a version number. If one isn't provided, leave a
  placeholder like `## [Unreleased]` instead of guessing.
- Don't editorialize ("massive improvement," "finally fixed").
  State what changed, plainly.
- If a diff contains no user-facing change at all, say so instead of
  padding the changelog with internal detail.

## Example

Input: a diff adding rate limiting to `/login`, fixing a null pointer
in the export flow, and renaming an internal helper function.

Output:
## [Unreleased]

### Added
- Rate limiting on the login endpoint.

### Fixed
- A crash that could occur when exporting an empty report.
Notice the shape: a when to use this section (redundant with the description, deliberately. It's a sanity check once the body is loaded), a numbered workflow, an explicit constraints list of what not to do, and one worked example. That's a reliable default structure for almost any skill.
Step 5: add scripts, references or assets, only if you need them
This skill doesn't need any of the optional folders. It's pure instructions. Reach for them when a specific need shows up:
scripts/if a step is more reliable done in code than described in prose. If this skill needed to parse a specific commit message convention exactly, a small script beats explaining a regex in prose.references/if there's detail that would bloat the body. A full internal style guide for changelog wording could live inreferences/style-guide.md, with the body saying "follow the tone rules inreferences/style-guide.md" instead of inlining them.assets/for templates. A fixed changelog file header or a boilerplate structure could live here.
If you do add any of these, the folder ends up looking like:
changelog-entry-writer/
├── SKILL.md
└── references/
    └── style-guide.md
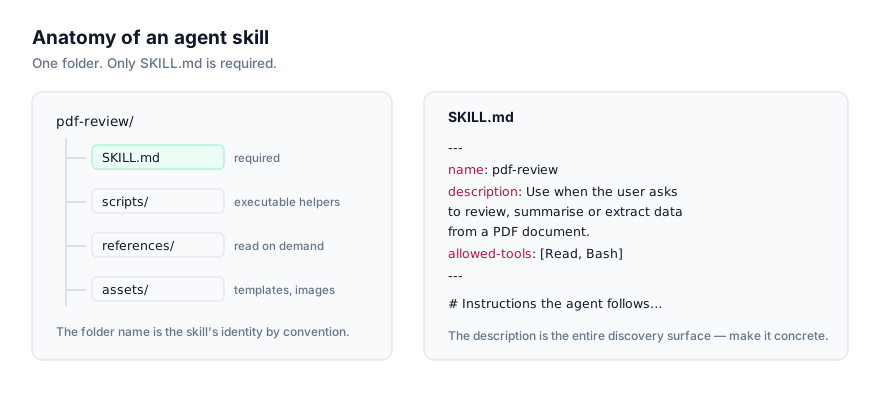
Add them only when a real need appears, an empty scripts/ folder some future you never fills in is just clutter, not a feature.
Step 6: keep the body focused
If you notice SKILL.md growing to cover several distinct tasks (changelog entries, and also release announcements, and also version bumping) that's a sign to split it into separate skills rather than one sprawling one. Each skill should answer to one clear description. If a single file is trying to answer to three different situations, its description usually degrades into something vague enough to weaken discovery for all three.
Step 7: install it locally
The fastest way to iterate is a project-scoped install, since it doesn't affect anything outside the current project. Drop the folder into your agent's project-scoped skills directory, for Claude Code that's .claude/skills/, for Codex CLI it's .codex/skills/; exact paths per agent are on the platforms page. Some agents pick up new skills immediately, others load skills at session start and need a fresh session. Check the install guide for your specific agent, for example installing skills in Claude Code or installing skills in Codex CLI.
Step 8: test that it actually activates
This is the step people skip, and it's the one that catches the most common failure. Writing a good body is necessary but not sufficient. You need to confirm the skill actually fires.
- Phrase a request the way a real user would, not the way you'd phrase it knowing exactly what the skill does. If the skill is meant to trigger on "write a changelog entry," test with that phrase, and also with a couple of natural variants ("summarize what changed in this diff," "draft release notes for this").
- Check whether the skill loaded, not just whether the output looks plausible. An agent can sometimes produce a reasonable-looking changelog from general capability without ever loading your skill. That's a false positive that hides a discovery problem.
- Test a near-miss deliberately. Try a request that's adjacent but shouldn't trigger the skill, and confirm it doesn't. This catches descriptions that are too broad, not just too narrow.
- If it doesn't fire, fix the description first, not the body. This is the single most common mistake in debugging a skill that "doesn't work", people rewrite the workflow steps when the actual problem is that the agent never got past discovery. Go back to Step 3.
- Re-test after any description change. A description edit can fix one phrasing and accidentally narrow out another you'd previously covered.
Troubleshooting common problems
A handful of issues account for most "my skill doesn't work" reports. Match the symptom before changing anything.
The skill fires on requests it shouldn't. The description is too broad. It's matching situations beyond what you intended. Add a disambiguating clause ("use this for changelog entries, not full release announcements") or narrow the phrasing itself.
The skill doesn't fire on requests it obviously should cover. The description is too narrow, too abstract, or uses phrasing a real user wouldn't. Go back to Step 3 and rewrite it around the exact situation and language a user would type, not an internal description of what the skill does.
The skill fires, but the output ignores the constraints section. Check that constraints are stated as explicit, direct instructions ("never invent a version number") rather than implied by the workflow steps. Agents follow what's stated plainly better than what's merely implied by omission.
The skill fires correctly some days and not others, with no code change. This is usually a sign the description sits right at the edge of matching, a request phrased slightly differently no longer triggers it. Widen the description to cover the phrasing variants you actually see people use, rather than treating each miss as a one-off.
A bundled script never seems to run. Confirm the workflow step actually names the script and describes when to invoke it. A script sitting in scripts/ with no corresponding instruction in the body is invisible to the agent, bundling a file isn't the same as directing the agent to use it.
The skill works for you but not for a teammate. Compare install scope and agent. A project-scoped install only activates inside that project; a skill you installed globally won't automatically exist in a teammate's setup unless they install it too. Confirm you're both testing on the same agent, since discovery timing differs slightly between them.
Step 9: publish it
Once it works, put the folder in a public GitHub repo with a LICENSE file, so anyone using it knows the terms. From there, anyone can install it via the cross-agent CLI:
npx skills add your-username/your-repo/changelog-entry-writer
Before you publish, do one more pass with a critical eye, imagine you're the reader working through our security checklist on your own skill. Nothing in the example above should raise a flag, but it's a useful habit to build regardless: a clear license, no unexplained scripts, allowed-tools (if you set it) matching what the skill actually needs.
Recap
The mechanical steps are simple: a folder, a SKILL.md with name and description, a procedural body, optional scripts//references//assets/ added only when needed. The part worth spending real time on is the description. It's the only field standing between a skill that works and a skill that sits installed and silent. Write it to name a concrete situation, test it with phrasing a real user would use, and fix it first when something doesn't fire.
For the full picture of how the format fits together, see The SKILL.md Format Explained and What Are Agent Skills? The Complete Guide. To understand exactly how discovery and activation work under the hood, read How AI Agents Discover and Activate Skills. Once you've written a few, browse the skill-authoring category to see how other authors structure theirs.